Wednesday, March 27, 2013

Bath Remodel Day 8

Day 8 was the best day so far. We added what I call the bling! This is what really makes the shower pop. I used 12X12 glass tiles on a mesh backing. They interlock on the ends, so we just had to cut the very bottom one and the top one. You'll need to use a white mortar with this so the tiles don't change color. The browns and the grays blend beautifully! Plus I had my helper back. It goes so much faster when one person is laying the tile and the other is cutting.
I couldn't wait to get the soup dish in. It looks awesome. It is a resin product but has a travertine look. Saved a lot of money here.
And the corner shelf completes the tiling in the bath/shower area. Only grout to add.
This is when it starts to get exciting to see all the hard work come together. I know my son said he would never refer to the glass tiles as bling, LOL, but I think it is quite the addition. Next up...laying the subfloor and tile. I hope you check back to see how that went. And I also hope you are taking the time this holy week to remember what our Lord and Savior did for me and you! Have a great week and hopefully by Easter I'll be able to show you a completed floor!
Linda
 

Saturday, March 23, 2013

Bath Remodel Day 7

Wow, I am so excited. I got help from hubby today and we made awesome progress! Finished the back wall with tile and nearly completed the right side. Tomorrow I may get to start with the glass tile. I've never cut glass tile before. We will see how it goes. This is the bling of the shower and I want to make sure it is perfect. But that is for tomorrow. Hubby brought home dinner so it's time to eat! Thanks for checking in on me. Come back for day 8!
I hope your day has some fun projects in it!

Linda

Bath Remodel Day 6

So far so good. Another day of tiling by myself. Adding the tile to the slanted area was tricky but I got to use the beveling function of the wet saw. That was fun.
Staying up till midnight to tile requires a sufficient amount of caffeine but this is my progress so far. Check back in to see what day 7 brings. It's going to be a lot of fun!!

Linda


Friday, March 15, 2013

Bath Remodel Day 5

As promised Day 5 was awesome. Working by myself takes a little longer. I tend to over think. Plus I wanted to study up and watch a few videos on You Tube to tune up my tiling knowledge. (it was 2010 when I last tiled) Plus add to all that I tend to be a little meticulous.

First I measured my tile to be used. Even though you by 12x12 tiles, most of the time they are really 11 3/4 x 11 3/4. This is taking into account that you will use a 1/4 spacer. I marked on the back wall the height of where I wanted the first row to be. Using a long level, I marked a line across the width of the bath tub. Then I found the center point and snapped a plumb line. No easy task doing it myself. Then I screwed a board on the first line I marked, where there second row will start. This ledger board helps keep the larger tile in place plus helps keep things level as a starting place.


You can see blue painters tape on the tub. I decided I would tape off the tope of the tub. That way if mortar dropped and fell in between the ply wood cover and wall it could be easily cleaned up. After mixing the mortar with a paddle on the cordless screwdriver I went to work laying (or is it hanging if it's vertical?) the tile. I decided that I would back butter the tiles instead of applying it to the walls. Unless you are a pro applying the mortar directly to the walls is a messy job. I started by marking my first whole tile at the center point so I could line it up with that plumb line I snapped. I worked out to the side walls from there. I needed to cut about an inch off the tiles that were on either end. This was a breeze using my newest favorite tool, the wet saw! Thus, the progress below. I really love this tile. It has some great shades of gray in it. I'll take a close up picture later for you to see.


After making dinner, I was tired and thought I may be done for the day. But with hubby coming home from the business trip in the morning I really wanted to WOW him with my progress so I forged ahead. My day ended at 11:30 PM (that was with cleaning up all the tools and taking a McFlurry run to McD's). On a side note. The orange waterproofing membrane, I wouldn't spend the money on it if I had to do it again. Expensive, if you don't get it level it makes your tiles harder to get level and once you get a tile up and decided you need to take it back down for adjustments, too bad. I found this out the hard way. The suction of the mortar coming up brings the membrane with it. At that point you have to decide what your options are. That will be taken care of on Day 6.
 
 
Back to tiling. After that 5th row the ceiling is on a slant. We didn't have tile there before but I thought it would be cool to take it up to the ceiling on both sides and include this slanted area. (Imagine you hear elevator music playing while you think this over) Measure, measure, measure. The top skinny row has to be short enough to properly meet the tile on the slanted area. I used a cool feature on the wet saw and beveled the edge of the upper tile to meet the flat surface of the tile below it. So awesome. The little niche you see on the right side is where the corner shelf will go. I dry fitted it and it should go up no problem. I want to install it when I get the tile on that right side up. Now I know Day 6 will be awesomer. :) Come back to see how it goes!      Linda


Tuesday, March 12, 2013

Spring, refreshing in every way!

It was such a nice sunny afternoon, I took extra time to play with the dogs in the backyard. They play fetch really well. Harper is a chocolate lab. I love it when I throw the ball and he catches it on the first bounce. Job well done! Ellie is the pup. A black lab mix. She races back with the ball and so gently drops it on the ground before me. What joy these two bring to our household. I could tell they could feel Spring in the air. As I took a few extra minutes walking the grounds with them I noticed signs of Spring.  Daylilies sprouting from old leaves not yet pulled away, peony buds just beneath the mulch peaking out and tulips and daffodils emerging. I wondered all winter if the squirrels would once again dig my bulbs and carry them away. I see they have survived for the bunnies to start munching on them happily. While I have tried blood meal, cayenne pepper, human hair and even urine (at that time I was the Mom of young boys). Nothing scared the bunnies away. So this afternoon I took the time to cut up some chicken wire and place it over the emerging bulbs. I don't know if the bunnies will still be able to get to and munch those tasty treats but I do know the time I spend in the garden is so refreshing and mind clearing, it could cure illness. Time spent out in nature gives us time to listen. Listen to what God is telling you. As we come to another Easter we remember what He did for us. As the new growth sprouts from the ground I remember that He rose from the ground to save me. How can I serve and thank Him for this? By listening. Listening to Him. Spring is almost here. What does it have in store for you?

Linda

Monday, March 11, 2013

Bath Remodel Day 4

One of these days I'll see tile on the walls but not today. We found out the mortar we bought to put up the water-proofing membrane was not the correct type. So we returned it. Now our 3 hours to get something done has turned into 2.
We used a product by Schluter-Kerdi. I truely hope it is worth it as the extra steps of putting up another vertical layer takes time. I'm going to wait at this point before I start to lay tile. I need to be rested, have a plan in mind and a clear head to execute the plan. Thanks Tim for coming over to help make sure my wet saw was assembled well for my safety. While hubby is working this week I need to work at getting my house clean for weekend guests. The thought of doing that is clogging my brain from thinking clearly on the tile project. Check back in, Day 5 promises to be an awesome day of progress. I can't wait!

Sunday, March 10, 2013

Bathroom Remodel Day 3

This remodeling process is a little slower than I would like but we are not professionals and I tend to over think things. :) It's coming along. Today we were able to finish putting up the hardi backer in the shower. And to prove I had help....I like looking at the shadow. It makes me giggle. I had the super hunk muscle man helping. ;)
Screwing through cement board is hard work. So I let hubby do it. I then went to work mudding and taping. I know I have told you this is not a skill we are good at, but I figured I could give it a go since the tile will eventually cover it up.

It is a skill and I don't think I did too bad. I did mention my son helped in the demo portion of this reno. He did a great job and was so cute.

 Thanks for checking in on me. Check back tomorrow for more progress.
 

Friday, March 8, 2013

Bath Remodel Day 2

Today did not seem very productive. I spent most of the morning scraping mortar and caulk off the tub. My husband had some time this afternoon and we were able to get some hardi backer hung. Had I known what a dust mess it makes when you cut hardi backer with a table saw I would have cut it outside. Wow, what a dust storm. I now have an inch of dust throughout the whole house and we were cutting it in the basement. When the batteries ran down on the cordless drill we ended for the day. I still felt I needed to continue with the progress so I cut drywall to patch the walls where the tile was as baseboard. Once we get to the point that the drywall needs taped and mud we plan to call a professionsl. Taping and mudding is not in our bag of tricks. We'll have the wall repaired where the mirror was glued also. Tomorrow we hope to be a little more productive. Thanks for checking in on me. :)

Bathroom Remodel Day 1

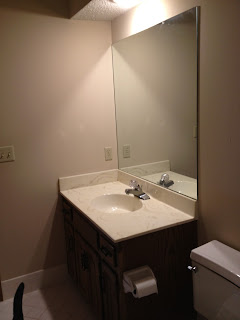
We love the old home we bought 5 years ago, walked into it knowing every room needed to be updated. The house is beautiful and has good bones. And no one can accuse us of being afraid of a little work. But we can't put this off any longer. Over Christmas we found a leak from the 2nd floor bathroom. No doubt it is from failing grout. I've been shopping and we have most of what we need to do a bathroom renovation. This is the "before".

 
Pretty boring. All white tile, counter top and floor. Beige walls. Builders mirror. I guess I should be thankful the previous owners took all the wallpaper down before we bought it. The plan...tile the tub/shower area. Tile the floor. New mirror. Add sconce lights for either side of the mirror. Paint the walls, paint the vanity. New pulls for the vanity. Granite counter and new sink. New faucets for both the sink and tub. And new towel rack and TP holder.


We've ended day one of demo. I even got my son in on the fun.


My son and I removed the mirror, took the drawers and doors off the vanity and removed the pulls, took out the toilet, removed the bath walls down to the studs, removed the floor down to the subfloor. The tile was up the wall like baseboard so that had to go too. Check back with me tomorrow to see our progress.


Monday, March 4, 2013

New Floors for Thanksgiving

Now if you haven't guessed it by now, we have a little bit of crazy in our family. We were expecting 11 people and 3 dogs to our 4 people, 2 dog house for Thanksgiving. On the Friday before Thanksgiving I told my husband how Lumber Liquidators was having an awesome sale. The wind was blowing in the right direction because the day ended with us coming home with new flooring for the Dining Room. I mentioned the 2 dogs, you've seen them before. They're not small. We got a 3/4 inch engineered handscraped golden teak. This is hard stuff and will hold up to our big pets. My husband did alot of the initial removing of the old carpet and pad. Below you see the blue padand the old carpet. It was old and raising dogs from puppies, yep, and few accidents happened in that room.

 
It was a long night to get up all the staples, sweep up all the dust and debris. But on the plus side the floor is relatively level so we could move forward. I removed the baseboards as I wanted to reuse them.


The particular flooring we laid is a floating floor. No nailing required! Just click it together. The pad is attached to the back of it. No need to lay anything over the subfloor. 
 
 
By Sunday night the floor looked like the above picture. I can honestly say I did most of the work myself after the hubby got the old carpet up and out. I used a miter saw to cut pieces as needed. You want to lay the floor so your seams don't line up and pieces around the walls can't be any shorter than 12 inches or so. Now was the time I started working on that baseboard. I took the old off and as I did this I numbered the pieces so I knew where they all went.
 
 
 I also bought new quarter round, stained both the baseboard and quarter round. This took longer than I thought to dry so the whole project slowed to practically a halt. The stain was not drying fast enough. Plus I wanted to put 3 coats of polyurethane over that.  So needless to say Thanksgiving came and went with new floor but no baseboards. It still looked awesome.


I did finally get the baseboard and quarter round on after all the family had left. I just love the floor. I'm thinking since this is the second room we've put this flooring in that a third is in the future! If you want to lay a new floor yourself and have questions, let me know.
 
Linda