Friday, January 31, 2014

Baby Shower Fun!

I'm in a couples bible study group with couples all about the same age. So, needless to say we all have kids about the same age. Thus new joys come to the lives of those kids. This was our fun opportunity to host a baby shower. 

Theme: pink. We knew it was a girl, having been born a month earlier. Next step to Pinterest I go. What we did before Pinterest I can't remember. So glad for it. My friend Julie and I were hosting this together. She wanted to keep it simple and small. So I reigned in all my let's do it up big ideas and this is how we made this special day beautiful for Becky and new baby Madeline.


Bringing out the spring colored table cloth, I set up our games their. Right from Pinterest I printed the "Price is Right" Game. Making a copy for each player. I bought the items listed on the game. These will go to the new Mom when  our day is done. Things like diapers, jar of baby food, pacifier, baby shampoo and so on. Each guest had to guess the price of each item. I printed off the prices, used scrapbook paper to mount the price on one side and the name of the item on the other side, so that when it was time to reveal the price I simply flipped the card over. I also found the Price is Right theme music on You Tube and played it while introducing the game. That was fun.

The other game we played was "what's in your purse". Again a game I found and printed using Pinterest. Points are scored according to what you have in your purse. The prizes for each of the games was chocolates. What woman doesn't have a sweet tooth.

For decorations we also kept it simple. I have a local Carter's Outlet store near by so I purchased several cute little outfits as my gift to baby Madeline and hung them on a clothes line across the room. Sure we could have bought crepe paper and balloons but then you just throw them out. The clothes are useful. :)


Julie was on food detail. She makes an awesome cheesecake! She also brought trail mix and fresh fruit and some pink lemonade to boot. A few pink gerber daisy's in a vase, pink diaper pins and clothes pins scattered about the table and to top it off I framed the birth announcement.

What a perfect afternoon to spend with some lovely women and precious baby Madeline. What a blessing it was to be able to do this.

I hope you have a blessed day wherever you are.
Linda

Floors so easy, you can install them too.

With two rooms under our belt it was time to give my husbands office an upgrade with new flooring. And why not he is lucky enough to work out of his home he deserves the best. Here is a before picture. I'd already started removing furniture and things off the walls.


I really wanted this carpet out of there. So I got right to work.


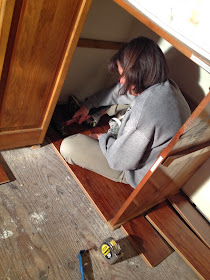
Taking a utility knife and cutting the carpet and pad into manageable sizes is the first step. Plus this will help with disposal. Some cities allow curbside pick up for a small fee. My method is to fill up the SUV and have hubby take it to the dump. It too is a small fee. But what man doesn't like to take a trip to the dump. Hmmm, must be a man thing.


Next step, cleaning up all the staples and nails so I have a clean surface.


I couldn't resist. while the room was empty and I was about to pull the base boards I thought this would be a great time to choose a new wall color. I choose the color on the right. "Tornado Watch", it's a Valspar color I got at Lowe's. I didn't want to go too dark. This room faces north so doesn't get alot of light. Paint while nothing is in the room and baseboards are removed. It makes it so much easier.


Bring your flooring in to get it acclimated to the temps in the house. And now you can see where all the stuff from the office went to. Who knew his closet could hold so much? My flooring is Golden Teak. Engineered, handscraped, floating floor. I got it at Lumber Liquidators. The store in my area has people that are very helpful to someone like me that is a DIYer.


I set up my work station right outside the front door. Handy, yet keeps alot of the dust outside. You'll need measuring tape, speed square, jigsaw, clamps, marking pencil and a miter saw.


So get started. There are some really good video's on the Lumber Liquidator site to show how to lay a floating floor and You Tube is filled with them. Another go to is the DIY channel. Measure, cut, make sure seams don't land closer than 12 inches from each other. Always buy plenty as you'll have more waste than you think. I used a Dremel tool to cut the bottom of the door jams. To get the right height place a piece of your flooring down and saw above it for a perfect fit for the new flooring to slide under it.


I took the flooring into the hall and that means including another closet. Don't be afraid to work in small spaces.


You'll be pleased with the results.


Next it was time to get to work on the trim. You already know I'm frugal. I removed the existing trim, sanded it down and chose a matching stain. Adding three coats of polyurethane. I purchased quarter round, stain and polyurethane went on that too. Cut to fit and install. I used a finish nailer. Be sure to miter your corners for a professional look.

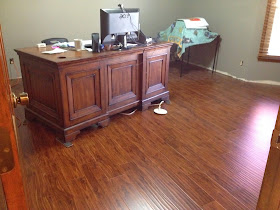
And now what you've been waiting for the finished product. I had to wait to for this step as I hired electricians to come install can lighting in the room. It gave excellent light and really updated the look of the room. The old single "boob" light in the center of the room just wasn't cutting it. 


I love how the room turned out. I found this rug at Lowe's. It really brought all the elements in the room together.


One can light in the center of the room and one in each corner was enough for just the perfect lighting. We had it hooked up to existing switch and they put a dimmer on it as well. Bonus! Remember when adding cans, take the height of your ceiling and that is the diameter one can will illuminate onto the floor. Ours were 8ft ceilings, each can lighted up 8ft on the floor. This room is only 13X16 so more lights would have been too much.


Rearranging hubby's memoribilia on the walls, adding this thrift store chair find and repainting an end table someone left out for the trash...New Office finished.
He is super happy with the result and so am I. Thanks for checking in on me. Leave me a note to let me know what you think. I do truly love hearing from you.
Linda

Thursday, January 23, 2014

Feeling Healthy

Growing up I was never athletic. In junior high I was average enough height to play on the basketball team. LOL! Maybe some day I'll dig out the picture in that uniform. Long hair in pigtails Jody and Buffy style. White knee high athletic socks. Oh, and if you know who Jody and Buffy are you're no spring chicken either. Anyway, at 5'2" the other girls quickly passed me in height. I was doing good to grow another inch. I like to call it being height challenged. At any rate once I married and found a full time job, it seemed others around me enjoyed being fit without being on a sports team. It was the 80's and Jane Fonda had us digging those tights and spandex jumping around the floor with aerobics. Then before you know it Denise Austin was the biggest thing in exercise VHS tapes. Well let's jump forward a few years. Now my husband and I belong to the local YMCA. It took me awhile before I would go and do what I term the "Man workout". He would go, lift free weights, run on the treadmill or use the eliptical trainer. Now he has always been athletic. Playing football, baseball, swimming and hockey. Even found himself on his college hockey team. So going into this type of later life workout....he had discipline. I did not and felt the "Man workout" was boring. Then I finally got brave enough to wonder into a class. Never again will I attempt the Man Workout. There are so many different classes. Fun music, making new friends, awesome instructors and getting the benefit from body pump, cardio dance, cycle, tread, core and much more. I've had pretty good success keeping fit. So it was time. Time to do something else, get outside the box and expand my horizons. It's three days before Thanksgiving, although family will be in town they aren't staying with us so we feel we have a little extra time on our Holiday. So my husband announces he has signed us up to run a 5K. This will be the first for he and I to do this. Not putting alot into training for it, we decide it's only 3 or so miles. We can do this. And to give me more comfort my 21 year old decides he will join in the fun too. His form of exercise is to lift the remote to change the channel. 


It was a little cool but the sun was shining. It was awesome.


Our #1 son didn't run but played as our photographer. I can't think of a better way to start off our holiday season. Was one of your New Year's resolutions to get fit? Lose weight? Eat healthier? You can do it. You'll feel better and enjoy life more. Find a workout buddy that will keep you accountable. Whether joining a club or taking a daily walk in your neighborhood. Get out and get healthy! We plan to run a 5K every Thanksgiving. So if you're spending the holiday with me, bring your running shoes. 

Linda

Wednesday, January 22, 2014

Wedding Shower, Wonderful!

I gave a wedding shower this past fall for a dear friends' daughter. I have 2 sons so any time I can do girly things I am all over it. And what a pleasure to be able to give a shower to help start a young couples life together. 

If you have read some of my posts you know I am somewhat frugal. I tried to make things to decorate for the shower that could be used again. 


As you know I love visiting The Graphics Fairy . I used her Citrasolv method to transfer this image to fabric. Trolling around Pinterest I saw something like the above image. I created this on Microsoft word, printed it in reverse and then followed these steps. After checking out what the  Bride and Groom had registered for, I found fabric I felt would go in their new living room or bedroom. And you can follow these instructions to sew the pillow. 


I had a ton of sheer white fabric that sparkled. Now I did not purchase this. This was a leftover from son #1 wanting to woo a girl and in doing so decorated our house and made her dinner before taking her to a dance. I used this to drape a chair. Bought tulle in the color of the wedding at a good discount and added it to the bride's chair.


I had alot of tulle. And the future Mrs. B had asked for my help with making bouquets. Before I left her house I took some leftover purple hydrangeas and made this decoration for the front door. I wish I would have gotten a picture of it up close. This was sent home with them and used as a table runner at the rehearsal dinner. Picture it laying on a long table with tulle extending in opposite directions of the bouquet.


The banner that hung from the mantle said Bride To Be. I used burlap I had leftover from another project, purchased purple scrapbook paper and transferred the letters to fabric. Cut into triangles and used a glue gun to attach them to twine.


I made prints of a few of the engagement photos and bought frames to put them in. This will make a nice addition to the food table plus look awesome in the new couples' home.


Just wanting to try another DIY project, I had an old frame. Painted it with silver craft paint. Then taking the glass I sprayed it with chalk board paint. Instant decor. Use chalk to write your own message, wipe clean afterward and use it as your next grocery list area.


Wanting the table to look a little special too, I used another engagement picture and from my printer, printed small photos on regular paper and taped them to leftover scrapbook paper, cut in rectangles. Hole punch the top and add it to the silverware with a bit of tulle.


I borrowed white table clothes and used my silver to display the brunch. This adds a touch of elegance to any home. Check out Initial Love to see how I made the letter B. And again the bride can take it home.


And to my surprise she used it at the reception as well. Some mini quiches, parfaits and bakery items made for delicious eats. Put the TV on the Love Song music channel and you have set the mood. I hope you have gotten some good ideas for your next shower. I sure had fun doing it.

Linda

Tuesday, January 21, 2014

Thinking back to Fall.

Wow, I have so many projects to update you on. Let's go all the way back to fall.
Veggies, veggies, veggies is all I can say.


My garden really produced this past summer. I can't tell you my secret because I don't know it. Many of my friends were very discouraged as their produce did not perform. I ended up making 52 pints of salsa. Green beans were given to friends, family and co-workers. Squash was coming out my ears. I even gave canning pasta sauce a go.  I may have to expand the garden next summer. What should I add? Potatoes? Cucumbers? Tell me what you think.


No, I didn't grow pumpkins but I do have the space to. Hmmm, very tempting. But back to why I'm showing you this pumpkin. My sons used to carve pumpkins with me each Halloween. Now they are older and never around so it's up to me to continue this fall tradition. I went to www.bhg.com and found pumpkin carving stencils. My furry friends influenced me this year. 


Sitting pretty here, from left, Harper and Ellie are very loyal companions so I honored them in my carving. Here's a few pictures on how I did this.


Print out the stencil from the Better Homes and Gardens website and tape it to the pumpkin.


I used their instructions of pin poking along the stencil lines and then used a knife to start cutting. Be sure that in your initial cleaning of the pumpkin you carve down the interior well on the side your stencil will be. My pumpkin was a little ripe so it cut easily. I had pumpkin carving tools you can get at your local grocery store, dollar store or big box store.


Very easy. Don't be afraid to give this a try next Halloween. It does take a little more time but well worth it. My other pumpkin I wanted to try something different.


I bought good old puffy paint and painted on my own design. I set the pumpkin on its side in a large bowl and painted one side at a time. Quick and easy!!


This tree is always my favorite in the fall. Such beautiful color. Thanks for checking in on me. 

Linda

Wednesday, January 8, 2014

More fun to come.

Wow, has it ever been a long time since my last blog post. I have been busy having fun creating and entertaining. I hope you had a blessed Christmas. Check back on me soon. I promise to show you all I have been up to.

Linda