Saturday, November 22, 2014

Burlap Wreath


Like many, I caught the bug to make a burlap wreath. After trolling through several "Pins" this is how I made mine. I had 4 - 15 feet by 8 inch rolls of burlap in the craft closet for 6 months. Time to put them to use. My starting point.


Head to your local craft store and decide what size of wreath you want. I went big. My house sits back from the street and I wanted my wreath to be noticed. This ring is 24" diameter. So what you'll need is:
wire wreath ring
burlap ribbon or cut your own (messy)
florals, letters or whatever you want to embellish you wreath


You could use a smaller width of burlap if you are making a smaller wreath.Tie the end of the burlap onto the ring.


Now pull the burlap up in between the wire and make a bubble for the lack of another term. Twist the burlap. This helps it stay put. So you're basically pulling the burlap up and back down in the same spot. Twist and do it again in another spot. Continue until you come to the end and tie off. Do this until your ring is fluffy with burlap to your liking.


I used hot glue to adhere the embellishments.


When you drive by, slow down and take a look. Happy Fall!

Thanks for checking in on me.
Linda

Friday, November 21, 2014

Wire Storage


This is what I see when I look under my craft/sewing table. I'm afraid the dogs will get wrapped in them and get hurt or I'll get wrapped in them and pull the sewing machine off the table. A quick run to Lowes is what would fix the problem. I purchased some cup hooks and screwed them into the under side of my table. To get a good placement I held the shelf upside down on the bottom of the table and made a little mark where I wanted the hooks to be. Make sure the cup hooks all face the same direction.


I also purchased a wire rack. This is typically used as a shelf to hold plates or whatever in a cabinet. place it on your hooks.


Gather up all those cords and set them on your new under the table shelf. I used twisty ties to hold some of the cords together as they are pretty long.


So I went from this....


To this!


The Girl Cave floor is now cord free. Neat and tidy.

Thanks for checking in on me.
Linda

Wednesday, November 19, 2014

Spaghetti Squash with Tomatoes and Olives


New Recipe Wednesday!

Spaghetti Squash with Tomatoes and Olives
1/2 of a 2 to 2 1/2 lb spaghetti squash
2 Tbsp olive oil
4 cloves garlic, minced
2 - 14 1/2 oz cans diced tomatoes with basil, garlic and oregano (undrained)
4oz dried whole grain spaghetti
1/2 cup pimiento stuffed green olives, coarsely chopped
1/3 cup golden raisins
1/4 cup snipped fresh basil (I skipped this and it was still super tasty)
2 oz feta cheese crumbles (1/2 cup)

1. Halve spaghetti squash. Remove strings and seeds. Place up half upside down on plate in microwave. Cook on high 12 minutes or until easily pierced with a fork. Cool slightly.

2. Meanwhile, in a large saucepan heat oil over medium heat. Add garlic, cook 1 minute. Add tomatoes; bring to boiling. Boil gently, uncovered for 15 minutes, stir occasionally.

3. While tomatoes are cooking, in a large pot cook pasta according to package directions; drain and return to the pot.

4.When the squash has cooled slightly, using a fork, scrape the pulp from the squash into strands. Add squash, tomato sauce, olives, raisins and basil to pasta in the pot. Season to taste with black pepper. Serve topped with feta and additional snipped fresh basil, if desired. makes 4 servings.

Enjoy!!!

Sunday, November 16, 2014

My Boys


I have been on a journey this year to add to my bare walls. My boys are older now and moved or near move out age, but I will always be their Mom and always be so proud of them. They will always be my babies. I took several pictures of them together through the years and had them matted and framed. Add in a couple of the pieces of art they created in elementary school and a P. Buckley Moss entitled "Brothers Together" and there you have it. I see this every morning when I wake up.

No matter how old they get I'll love them forever!!

Thanks for checking in on me!!
Linda

Saturday, November 15, 2014

Sweater Skirt


I've been looking at all these "pins" that showed how to make a skirt out of a sweater and my love of sewing just wouldn't be complete until I made one. So while Mom-in-law was getting her hair done while here on a visit I slipped down to the thrift store. I ended up buying to men's sweaters and and chair and only spent $29.00. So after throwing the sweater in the wash and buying 2" wide elastic here is what I did...

First cut off the sleeves.

Then, decide how long you want the skirt to be, measure and cut. Remember the waist of the sweater will be the new hem of your skirt.

If you have a serger you can serge the cut waist of your skirt. But if not then you can zip zag stitch it so you can control the unraveling. I bought a sweater that was a little too big so ended up cutting down the sides and sewing to fit. My suggestion is to find a sweater that will give you the fit you want and leave the original side seams. 

Next grab your 2" wide elastic, cut length to fit and sew short ends right side together. Here it is already attached to the skirt but it gives you a visual.


Now zig zag or serge it to the waist of your skirt. Just lay the elastic wrong side to the right side of the skirt. I put the elastic seam in the back. Remember when stitching it to the skirt stretch the elastic and sweater otherwise when you go to put it on it will rip your stitches.


And there you have it. A new fall skirt. I used this "Pin" to guide my steps. Check it out. Kelsey H, if you have questions give me a call. :)

Thanks for checking in on me. 
Linda


Thursday, September 4, 2014

Patriotic Letter

I decided I didn't have enough patriotic decorations around the house and it was almost the 4th. Nothing I saw in a store would be coming home with me so I took on a new project.
This is how you do it:

buy: A large wooden letter at your favorite craft store. Don't forget to use your coupon! This one is 18" tall and about 1/4" thick made of pine.
Paint of your choice. This is what I got. I love working with these acrylics. Easy clean up and dries fast.
Painters tape. Mine is almost 2" wide. Don't cheap out on this. Get the good stuff. It's worth it in the end.
Polyurethane, satin finish, if you want to hang your letter outside.

You'll also need sandpaper, fine grit, and small craft paint brushes. Don't use a foam brush!!! I tried it, the wood is too rough and tore foams bits all over my project. :(

Let's get to it:
Paint the front side of the letter with white. Give it a good coat, 2 or 3. Remember it dries fast so this will take no time at all. Let it set overnight (or several hours) then grab the painters tape. Tape off desired stripes. Really press the edges of the tape down firmly so the paint won't seep under it.

Start painting the red stripes. Remember, less is more when you paint the taped edges. Light coats until you get the desired look. Once that's done go for the field of blue. Let dry and use the white again to paint your stars. It's a handmade item, the stars don't have to be perfect. After the stars are dry give the front and back 2 or 3 coats of polyurethane. I like to do this whether it'll be outside or note. It just gives it a shiny finished look.

I got fancy and cut some wire hangers to let them dry without sticking to anything. These particular letters have keyholes to hang them, however you may want to do what I did. I used the tiny screws that attached the hanger to display them at the store. Without screwing them in all the way, take some picture hanging wire or any light weight wire and wrap around each screw.

As you can see once I took mine to work, several more folks wanted one.

And this is for my friend that didn't know if a "D" would look good. This is going to knock her socks off. ;)

But wait! There's more. One friend asked if I could do a letter in a college theme. So with a little thought and some fun painting I came up with this. 

Ya, I'm probably breaking some kind of copyright laws but what's the internet for if you can't print the free coloring pages that are out there.


I have another order for 4 more letters. And a slipcover to make. So check back in on me and see how the Big Ugly Chair is coming along.

Leave me a note and let me know what you think. Remember I monitor your comments so if you don't see it right away that's because I haven't seen it yet. Thanks for checking in on me.


Friday, August 1, 2014

Not too old yet.

I have talked off and on about staying healthy. We belong to the local YMCA. It has great instructors that give great classes. They are motivating and the bonus besides getting fit and healthy... you make new friends. With that said, I am not a runner. I really don't like it because I usually run by myself and well the classes are with others, enjoying fun music. You probably remember my families' last minute entry into a Thanksgiving 5k last year. I thought maybe this spring I would give it another go. My hubby had suffered a torn achilles and was still recovering. I heard about this little 5k through my office. It was a benefit the county put on as part of Feed the Need. The entry fee would go toward providing food for the hungry in our area. Plus we could take canned goods to be entered into drawings and who doesn't like winning stuff. The weather had been cool and of course a few days before, it started really acting like summer. 


I won't lie. I had not been running or even working out in my normal routine, so this was brutal. I was whipped. 


But it has a great ending. I took 2nd place in my age group! This is my first medal EVER! My time was 31 minutes 16 seconds. Woo hoo! That was fun.

Get out and get some exercise this summer before the snow starts to fly and we're all couped up inside.

Linda


Wednesday, July 30, 2014

Hawaiian Shirt Refashion


This is my newest refashion! But it has a story that started 20 plus years ago. My hubby and I, my youngest sister and her hubby and my BFF and her hubby. We were planning to go to a Jimmy Buffet concert and thought we needed matching shirts. Fast forward a few years and we went to another concert, then another. When we heard he was performing in Chicago we said we were in! 


It always makes me laugh when I take selfies. Anyway, I could not show up to this concert in a shirt that looked like this. So something had to be done.


Cut off the sleeves.


Cut off the collar forming the neckline you want. Hem your new neckline. Next take in the sides. And finally give it the hem length and shape you want. I wanted mine to look more feminine so I took it up on the sides and swooped it down in the front and back.


I love it!! I'm withholding the other pictures of our family and friends in their big sloppy shirts to protect the innocent. But man oh man did we have fun! I hope you can do something just as fun this summer.

Fins to the left!
Linda


Monday, July 28, 2014

Puppy Love


This big boy is Harper. He's 8 years old. We've had him since he was 2. He's one lucky pup. He was just a few days away from being put down when we found him at a local shelter. Harper is the best dog ever! So maybe we are the lucky ones. Even at 8 he likes to chase bunnies. In April he shot out after a bunny and by the time I caught up with him he was limping in the worst way. A visit to the Emergency Vet proved Harper had torn his puppy ACL (CCL). We were looking at surgery to make him a happy running pup again, so that's what we did.


Ouch!!! Poor guy. I was one nervous puppy mom. 


This is Ellie. She's 3. She was pretty sad Harper had to be away for two days and even more sad when she wasn't allowed to play with him when he got home.


Harper was pretty sad he couldn't play, on top of that he had to wear the cone of shame.


But with some special loving from one of his boys, I am happy to report Harper is mending very well. His post op x-rays show good healing and the Dr. says he'll be running after those bunnies again soon. Take care of your pups. Remember never leave them in a hot car, bring them into the air conditioner if you can. Walk them in the coolest part of the day. And watch that they aren't walking on super hot pavement, we wear shoes, they don't. I hope you all have a puppy love kind of day.

Thanks for checking in on me.
Linda

Saturday, July 26, 2014

Veggies practically grow themselves!

Wow, this summer is just flying by. I can't believe I shared my vegetarian meal I had the other night and did not share the veggie garden itself. I planted in a hurry this May. So many fun activities once the weather starts to turn nice, it was hard to find time to plant. You'll have to forgive me for the weeds you're about to see. And that darn water grass/nut grass. If anyone knows how to get rid of this stuff and not kill every living thing for miles around please do share. But anyway, here's my 8 foot pole in the garden with the little house for the birds. 


The green beans are starting to grow and I noticed some beetles eating away at them. I'm not sure exactly what they were but I described them to the hardware store clerk and she lead me to the aisle with all the chemicals to kill and then regrow an entire garden. By the time I left there I had spent a fortune trying to grow vegetables, kill beetles, weeds and that darn nut grass.


I'm happy to report the beetles have not reappeared and the beans are delicious!


To prepare my bean pole for the soon to be climbing vines, I just take some sturdy string (I used twisted mason line) and my trusty scissors out with me.


And then go to work. I like to run the string so it is doubled through each eye screw on top and bottom. It just gives the beans a little more oomph to hang on to.


So far this year the vines have not grown inside the bird house. So that's good for the birds. :)


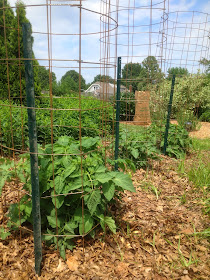
I was so tired of using tiny wimpy tomato cages I decided to splurge and go heavy duty. I've seen this idea around but I saw this You Tube video that made it look so easy I just had to try it. I got a few friends together that wanted to do the same thing then off I Lowe's I went and bought a roll of the concrete reinforcing wire. I then had the friends come over and with a heavy duty wire cutter (I guess we used bolt cutters) we cut 5 foot sections of the wire. It made the cost reasonable and these babies will last for many years.

 I cut mine then they sat until we came back from vacation.


You can see below how we turned the ends in so they would hook the other side of the wire to make a tube.


 These plants are towering over the top of the cage now.


 This is my poor little pepper plant I thought would not make it but now it is producing huge fruit!


And proof of growing cucumbers!


 That's the cucumber on the left.


Check back in on me. I'm sure to have tomatoes coming out my ears and maybe even a few recipes to go with them. I hope your garden is growing well.