Saturday, October 12, 2013

Pillow Trio Part 2


My last blog was how I transferred these images onto fabric. If you want to know how to sew the pillows hang around. This is what I did.
 
 
You'll need:
- sewing machine
- thread
- pins
- scissors
- fabric (I used leftovers from curtains, curtains, curtains )
- piping (cording)
- pillow forms
- button (optional)
 
For the 2 pillows I transferred images to, I cut the image fabric and the backing fabric to the size I preferred. The bigger one is 14x14 so I cut the fabric 15x15 and planned to use a 1/2 inch seam. The smaller one I didn't use a pillow form. I had some old polyester stuffing I planned to use so I cut this fabric in a size I felt matched to image also keeping in mind I needed 1/2 inch seam allowance.
 
 
Next cut a 2 inch strip of fabric to go completely around you pillow plus a couple of inches. Also cut piping the same length. Piping is really easy to make. Lay the cording in the center of the 2" strip and fold over with wrong sides together. Using a zipper foot on your sewing machine sew as close to the cording without running over it.
 
 
Sew the piping onto the fabric making sure your sewing line is 1/2 inch from the edge. When you come to the end of the piping, clip cording to meet the starting point leaving fabric longer. Fold under fabric enough to cover the starting point and continue to sew.

 
Place transfer fabric and fabric with piping right sides together.

 
Still using the zipper foot sew on the same line around the pillow leaving an opening to be able to turn it right side out.
 
Stuff with your pillow form and hand sew the opening closed.
 
If you would rather make a pillow that can be removed to wash you'll want to adjust a little. For the back still cut a piece that is 15x15. Set aside.
Now you'll need to cut two pieces that are 15x10.


Fold the end of each 15x10 piece under 1 1/2 inches and hem. Lay these two pieces so they slightly overlap. They will need to now measure 15x15 as a whole. Baste together at sides.
 
 
Grab the other 15x15 piece that you sewed the piping to. With right sides together sew front to back. Turn right side out by the over lapped area.
 
I found this cute button and sewed it to the outer section. It gives it the look of a real working button but it's only purpose is decoration.
 
 
This is the finishing touch to this one little corner. I hope you make something
today that makes you smile.
 
Linda
 

Friday, October 11, 2013

Pillow Trio


I've been wanting to try my hand at transferring images to fabric and adding to this one little corner . You've heard me talk about the great images that are free from www.thegraphicsfairy.com so I printed a few of them off and here's what I did...
I chose to transfer using the Citrasolv method. What you'll need:
- Citrasolv- this is a cleaning solvent
 - A copy of your image that has been printed old school. Find a copier that uses toner. The copy stores won't be of any help, they've skipped old school long ago. I found an old copier at a local grocery store.  
- Newspaper
- Tablespoon
- Tape
- Fabric
- paint brush or foam brush

A friend (Jodie at http://www.thenesteclectic.blogspot.com/) and I went in together and split the bottle of Citrasov as a little goes a long way. That's why mine is in an old pickle jar. :) Lay your newspapers down. Use several for thickness. I used some leftover canvas from the slipcover project as my fabric. Tape your copied image face down centered appropriately over the fabric. "Paint" the citrasolv over the page. Remember a little goes a long way. Grab that tablespoon and burnish the image well. Two minutes maybe. If you lift a corner to see how it's doing be careful. If the image  moves you're not likely to get it in the same exact spot. Take away the copied image, remove tape and let the fabric dry. This is a permanent image, however I found that if you machine wash it to remove the citrasolv the image will fade.


Here's my little bumble bee. I'll be making him into a 14x14 pillow.


And here's the bee's apartment complex. This is the first image I transferred and realized I use a little too much citrasolv. The image blurred a little. I made this into a small pillow.


This creation was given to the bride to be after the shower I had given her. The future Mrs. B really liked it. And it helped that with a little digging I found out what color the decor' in their new abode was going to be and bought fabric to back it to match. I saw this idea on Pinterest and then made my own design using Microsoft Word. When you print it out be sure to print the mirror image. Print-Properties-Mirror image on.

I made pillows but you may choose to make tea towels, napkins, frame it to hang on the wall, the list goes on. Let me know what you transfer.

Linda

Thursday, October 10, 2013

Initial Love

 
Ok, I might be a craftaholic. Or maybe I just have a Pinterest problem. But I feel if you find things on Pinterest why pin them if you're not going to try to make it. So I gave this a shot.
I saw this here.
Karen at Somewhat Quirky didn't like her end result but I couldn't wait to make one. This is what you'll need: Paper Mache letter, Alene's Tacky Glue, Aluminum Foil, Mod Podge or a Glue Stick, Gel Stain or Shoe Polish with Applicator Tip.
 
 
I wanted to have a plan in mind before dripping glue all over the place, so I took a pencil and drew out a design on my initial. (I'm making this B for a shower I'm giving to be part of the decorations and give to the future Mrs. B)
 
 
Remember to make your glue design thick. As the glue dries it will shrink. I went back over areas that ended up too thin with an extra bit of glue. Let the glue dry completely.


I chose to use Mod Podge because it is what I had on hand. A craft paint brush, some scissors and maybe some Q-tips will help with the next part. Cut strips of foil slightly wider than the sides of the letter. I then painted the mod podge on the wrong side of the foil strips and apply them to the sides of the letter. Smooth it on and wrap excess onto front and back of letter.
 
Now lay your letter on a sheet of foil and trace the shape. Cut the foil so it is relatively close to the exact size of your letter. Paint with your adhesive and apply it to the letter. Working quickly, use the Q-tips to gently press the foil around the glue design. Work from the center out to the edge. Foil will tear if stressed too much.
 
Once you have the front done, use the same method to cover the back. Try not to get glue on the "right" side of the foil as the staining medium may not adhere as well.
 
 
This looks pretty good like this but I couldn't resist and wanted to try the shoe
polish with the applicator tip.
 
 
I felt the shoe polish didn't come out well and would use gel stain if I do this again. Whatever medium you use, spread it around and take a clean dry cloth to wipe off any excess.
Let this dry completely.


Here are a couple of other blogs to see how they did theirs.
If you give this a try let me know. I'd love to here how yours turned out.
 
Linda


Wednesday, October 9, 2013

Hurricane Candle, gift for you!


I don't really consider myself as having a Pinterest problem, but wow, you can get sucked in. Recently I gave a bridal shower and borrowed some items from a couple of friends. When I saw this candle I thought it would be the perfect thank you gift. I found the original tutorial here.
 
In her blog Erin says she made this for $5 by purchasing all items at a dollar store. I was at Walmart and saw similar items for not much more. This is what I did.
 
I purchased:
Hurricane vase for $3.97 at Walmart
Cylinder vase for $.97 at Walmart
Bag of Moss for $3.60 at Hobby Lobby. It was on sale. One bag will make several crafts.
Candle to fit into cylinder vase was a 2 pak at Hobby Lobby for $5.99 but used my Hobby Lobby app coupon and got 40% off.
Candle ring in fall colors for $4.99 was 50% off so I paid $2.49. I couldn't find a spray or garland small enough. But this seemed to fit the bill.


First place your cylinder vase inside the hurricane vase.

 
The moss can get messy so I placed a baggie over the cylinder vase to keep the moss out.

 
Place the desired amount of moss into the hurricane vase.

 
Since I bought candle ring decor I had to cut the wire ring so it would fit around the cylinder vase. Place it into hurricane vase and arrange.

 
Place candle in cylinder vase and there you have it. The fall color spray can be replaced with the different seasons. My friend, Sheryl loved it and knows exactly what she will put in the vase for Christmas.
 
I hope you like it too. Leave me a comment. Let me know if these instructions were clear as mud. LOL I'm kind of a hands on person so good written instruction is important to me. And it's also important to me that you understand what I am describing. So if any of my tutorials aren't clear let me know. I'm happy to help. Linda


Tuesday, October 8, 2013

Photo Gallery


Back in August I showed you how to make a piece of art from simple
foam core board and buttons. Here is the end result hung. This large wall in my
dining room was just screaming for just this!
 
I've been setting aside items I felt would make a good photo gallery. An old photo of me and my twin, one of my husband, a postcard I picked up when visiting the Biltmore Estate, an old piece of sheet music I used in marching band, a photograph of my Grandma Sophie when she was a young girl and other treasures. During shopping sprees to the Flea Markets and Antique shops in the West Bottoms I've picked up some awesome frames. Check this out. You'll wish you lived here. http://westbottomsantiques.com/
I matched up my photos and art work to frames and took them to Hobby Lobby for mounting, matting and glass if needed.
 
 
I had seen many tutorials on how to place art for a photo gallery but I chose my own method. I laid out my pieces to find a pleasing display. I just wasn't loving it. Uneven, big ones on left small ones on right, empty spot under twin photo. It needed something else.

 
I was heading over to Walmart so I strolled through a few aisles I don't normally browse. Here I picked up the square mirror and the "Love". A little rearranging and I had it. I spaced my pieces anywhere from 1/2 inch to 3 inches apart.
 
Finding the center of my new layout and the center of the wall I started hanging. It took a lot of measuring and pencil marks on the walls but in a couple hours it was finished. Here's another method you may find easier. http://forevercottage.blogspot.com/2011/10/i-did-it-right-this-time.html

 
I'm very happy with my new wall. And I love decorating on a budget, it's not that hard. I have an idea for the bedroom wall. I'll share that when it's up.
 
Thanks for checking in on me. Linda
 

Thursday, September 19, 2013

Back to School


Classrooms need all the room they can get. When I was asked to make book pockets for my friends private school classroom how could I say no. You already must know it's hard for me to say no. :) She had purchased some canvas in blue and khaki and her Mom gave some decorator fabric samples to aid in the project.


Measure the chair back it will sit on. Decide how large you want the pockets to be. One pocket on the front lower side, one pocket on the back upper end. And there you have it. Our teachers are amazing. Let's give them all the help we can!  Linda

Wednesday, September 18, 2013

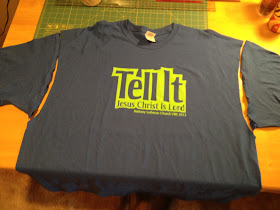
T-shirt Refashion 2013


You may remember last summers  VBS T-shirt refashion. Check it out 
here . I wanted to do another refashion but did not want to repeat but as I
am the VBS Director I had just a few things on my plate and did not want
to task my brain any more than necessary. So I decided to repeat a refashion
from last September. Check it out here to get the tutorial. But here are the
quick steps.
 
 
Start with an oversized t-shirt.
 
 
You'll also need a sewing machine, scissors, thread, straight pins, marking pencil, elastic, satin ribbon and another t-shirt in a contrasting color. I kind of goofed on this one as I got a 3XL. This caused more work than expected as it was WAY too big and made the emblem lower than I wanted so I had to cut the shoulders and re-seam them.
 
 
Cut the sleeves off and set aside.

 
Next cut your neckline. It's easy to get it even if you cut half, fold it
 over to use as a guide and cut the other side.
 
 
Decide how much to cut off of the sides if any. Sew your new side seams.
 
 
Now decide if you want an empire waistband or at the waist. Sew your casing on. I used the satin ribbon. It made it quick and easy. Thread your elastic into your new casing, adjust to fit and sew ends of elastic to secure.
 
 
Now it's time to grab those sleeves you set aside. Cut off the seam so it is not bulky when you reattach it to the garment at the sleeve. Trim down the circumference of the sleeve to fit. I wanted elastic around the sleeves so next I cut elastic and stretched it as I sewed it on. You'll have to cut the t-shirt where you want the shoulder seam to sit. And you'll want to trim the length of the sleeve to your liking before reattaching it to the dress. Reattach.
 
Now I really have to apologize as I do not have any more photos of the next steps.
 But look back here to get pictures and more detail.
 
I bought a childs'  t-shirt to make a ruffle for around the neckline. Cut 1" strips twice the length around the neckline. Sew strips together to make one long stip. Baste down center of strip and gather. Fit to desired look, pin to neckline and sew right over the basting.


I wanted this to be a dress, so taking the childs t-shirt I cut the length needed and sewed it to the bottom of the t-shirt. I think it turned out super cute and got tons of complements. If you have questions please leave me a comment and I'll try my best to get you an answer.  Linda


Tuesday, September 17, 2013

Chevron Stripe


When  my friends' daughter asks me for help I just can't say no.
They had moved and wanted to add her own style to her bedroom.
First we painted the room gray.
 
 
It's very light but you can see we chalked our lines. Kelsey wanted
one big stripe so we measured center, how thick we wanted
the stripe and took it from there.

 
Next use a good brand of painters tape and tape off your lines. Press them firmly onto the wall.


Kelsey chose a light shade of gray. Start filling in the stripe. When painting next to the painters tape, it's ok to paint on the tape, but I do recommend painting into the stripe. This will help not get paint under your tape. I also recommend less is more when painting near the tape. The thing you don't want your paint to bleed. So paint thin coats.
 
 
Take the tape off right away after you've painted. This will keep a crisp clean line.
 
 
Give it a try. I know you'll be great at it.   Linda