Tuesday, February 17, 2015

Sausage & Kale Pasta

New Recipe Wednesday

It's been awhile for a new recipe. Maybe I was waiting for just the right one? I think that would be accurate. It's winter in February all we really want is some comfort food. I have just the thing. Thanks Alyssa for making this for the family. It really hit the spot. And the added bonus of healthy items in it was super. We loved it. I hope you will too.

Sausage & Kale Pasta
serves 4-6

Ingredients:
  • ½ box whole wheat or whole grain penne pasta
  • 2 links lean turkey or chicken sausage
  • 1½ cups baby portobella mushrooms
  • ½ cup sun-dried tomatoes (tip: buy the ones that come in the zipper bag, not the kind in a jar soaking in oil...I found these in the produce section)
  • 1½  cups kale
  • 1½ cups spinach leaves
  • ½ cup shredded parmesan
  • ½ cup shredded mozzarella cheese
  • 1 tbsp whole wheat flour
  • ⅓ cup skim milk


Directions
  1. Cook pasta according to package instructions (Important: right before draining the noodles, save a ladel-full of hot, starchy cooking water-you will need that later for the sauce!)
  2. In a skillet, saute all vegetables. Season with pepper, garlic and onion powder, and Italian seasoning. Once tender, remove from pan, and cover with foil to keep warm.
  3. Remove the sausage from its casings and brown the meat in the skillet. Once cooked, remove from pan and drain any excess grease from the meat
  4. In the same skillet, add the flour to the pan drippings and whisk to form a roux. Note: you may need to add a teaspoon or so of EVOO depending on how much pan drippings you have
  5. Gradually stir in milk and followed by the reserved starchy cooking water
  6. Reduce heat, stirring slowly, and allow sauce to thicken.
  7. Stir in shredded cheese using a figure-8 motion until the cheese dissolves into the sauce
  8. Adjust sauce seasonings to taste, adding in garlic and onion powder and pepper to taste. Also, if the sauce gets too thick and pasty, add more milk or cooking water- you want this to have an nice creamy consistency
  9. Add the noodles, sausage, and vegetables to the sauce and stir to coat evenly.


Note: If you’re not a fan of sausage, try this with diced chicken breast or even lean ground turkey (seasoned with garlic and onion powder, Italian seasoning, and a little red pepper flake)
My son's girlfriend made this dish for us last weekend. I'm not even sure what EVOO is. But I will find out. Also, she did remove the sausage from the casings (or she had my son do it, it's good for him) but honestly I would have left the casings on, cut up the sausage and browned them as is. The spices aren't specific but I would be generous. I love garlic and onion so add them right to it. I would even goes as far to say that I'd cut up a half of an onion and brown it with the sausage and while you're at it throw in some minced garlic instead of using the powdered. 

HA! I just looked up EVOO boy do I feel silly. Stands for Extra Virgin Olive Oil.

This recipe came from a fellow blogger. You can find it here. All credit goes to Melissa at Honeybee Homemaker. I did add most of the notes.

Good eats! Thanks for checking in on me.

Linda

Monday, February 16, 2015

Office Chair Recover


One of these days when you check on me that ugly floor will be gone but for now let's concentrate on what is sitting on the floor. This chair is your basic student Office Depot desk chair purchase. I keep it in my kitchen because it's small. Fits under our little kitchen desk (also someday it will be gone) and it wheels to the kitchen table for that unexpected 5th person at dinner. This chair used to look like this.


Super ugly and plain, right? This is a quick and easy fix. I had leftover painters drop cloth from my Slipcovered Chair project. So I went to work.

This is what you'll need:
scissors
fabric of some kind
staple gun and staples
screwdriver or allen wrench

First flip that chair upside down. A little ingenuity and you'll figure out how to get the seat and back off. 


Now pry the cushions off using the tools of your choice.


Some models will allow you to remove the old yucky black fabric. Mine did not so I decided my canvas painters cloth was thick enough that you'd never be able to tell. I laid out the fabric over the pieces to be covered and cut. Giving each piece enough fabric to be wrapped around to the other side. Better to go too big than too small and waste your fabric. Start wrapping your fabric on your piece and tack it down using your staple gun. 


 The under side of the seat looks like this. 


The back side of the chair like this...


I had to tack the back of the seat in a few spots to attach it securely to the cushion. But if you have to and use a patterned fabric you wouldn't be able to notice it at all.


This was an easy recover and I had all the materials so it was free. Just what I like. Small update to our kitchen. Now to do something about that floor and those cabinets. 

Thanks for checking in on me. I know a few of you are waiting patiently for my freezer meals for 2. Soon, I promise it very soon. So keep checking back.

Linda


Saturday, February 14, 2015

Love is in the air!


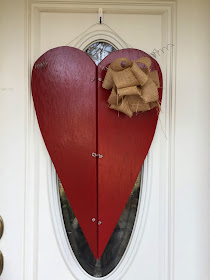
I've been working on all kinds of projects. From upholstery to freezer meals to quilting. But I panicked when I realized I had taken down the Christmas wreath from the front door and had nothing to put up for Valentine's Day. I went to the basement checked out all my wood scraps and a project was born. Now, I will admit, I don't have alot of original ideas. Pinterest is so amazing, so I usually see something I like and tweek it to be my own. 

This heart being sold on Etsy is what caught my eye and I thought I can make that! And this is how you can too! Or let me know and I'll make one for you because I just checked and this item is no longer being sold on Etsy. I still have wood scraps in the basement so your cost is bound to be good.


What you'll need:
a piece of wood to accommodate your heart size
wire (I used No.19 soft galvanized)
burlap
red paint
polyurethane

Tools needed:
jigsaw
drill
wire cutter
sandpaper
pliers
scissors
scrap paper

Ok, I have to apologize, I did not take many pictures of putting this together. I know, I am a bad blogger. So you are going to have to pull out the creative portion of your mind and put it to work. You can do it! I have faith in you!

First using your scrap paper cut the size and shape of heart you like. As I stated in my Fall Burlap Wreath my house sits a ways back from the street so I want to make a statement with what goes on my front door. Your heart can be smaller but mine measured about 29" tall by 21" wide. I then taped it to the door to see how it sized up. The Etsy heart is very small, you can see it hangs from a door knob. 


Next I ripped my piece of scrap wood down the center using the table saw. I love using my big girl tools whenever I can. I then took the heart pattern and cut it in half. Lay the pattern on the wood and trace with a pencil. Use your jigsaw to cut the two pieces out. 

Now grab your drill with a big enough drill bit that will allow the wire to pass through. I drilled 3 sets of wholes down the center of the heart. This is where you will run your wire to hold the two halves together. Once those are done drill two holes at the top of each heart section. This is where the wire will run to hang the heart. Great! Almost done with the drill. Think about bow placement. Drill two holes about an inch apart where you want the center of the bow to be. 

Sanding- I sanded the edges so I wouldn't get splinters but other than that I did not sand it. My piece of wood was a really nice piece of oak I'd bought for another project and then cut it too short. Ugh, I know. Hence the saying measure twice, cut once. But I knew some day I'd have a use for it.

My red paint was left over from Red Door of Welcome. Red always takes a few coats to get an even tone. Be patient and give it all the coats it needs. You'll thank yourself later. My front door is exposed to the elements so I always try to protect my projects best I can. Here I used polyurethane. Two really good coats. After it drys completely you may choose to sand it a little to make it look distressed. I kept mine as is.


Cut 3 lengths of wire long enough to attach the heart halves. Poke the wire through the holes and double back on it. Bend the wire on the front side and then use a small item like a pencil to wrap the wire around to make pig tails. I used needle nose pliers and wrapped it around them. 


Once the heart halves are connected you can cut a length of wire to hang the heart from. I added an extra length to again make pigtails. I took the paper towels off its holder and used that to make the big pigtails.


Burlap, You can buy it in a spool of ribbon. The wire edged kind makes it a little more durable. I had yards of burlap in the craft closet so I cut strips in 2 1/2" width. I reeaaallllyyyy wish I had a good video on how to make a bow. It is super easy but if you are like me, you are such a visual learner it is hard to imagine. I know there are some on Pinterest but I just did a quick search and some of them practically have you turning handstands to get it done. I promise I will give a tutorial soon on my super easy bow making. But for now if you need help you'll have to turn the handstands to get it done if you don't already know how. :( Because I cut strips of burlap instead of using burlap ribbon it frays a little. I think that adds to the character of the project. 

Cut a piece of wire to attach the bow, draw it through the two drilled bow holes and secure it in place. You can also pigtail the wire ends on the front side if you wish. You're ready to hang your heart. Now if you made your holes too far apart for the wire to hang it from it may make your heart a little 3 dimensional. Which at first I was a little worried about but now I am really loving it.


What a fast and easy project and I love it!!! I hope you do too. I hope your Valentine was good to you this year. Mine fed me Chicago style deep dish pizza. YUM!!! Reminded me of our dating days. 

Thanks for checking in on me. 
Linda