Linda
Tuesday, February 19, 2013
What time is it?
Linda
Friday, February 15, 2013
Can Apple Pie Filling
Wow, time really flies! I have been meaning to blog about apple pie filling since last October. So finally here it is. :)
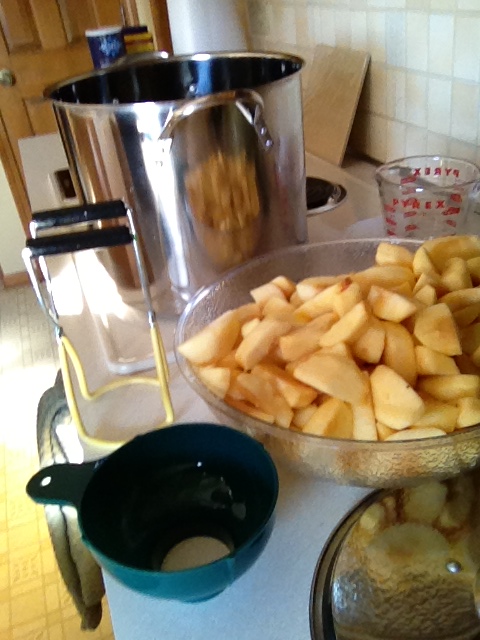
I am lucky enough to have a good source of delicious apples. Every fall I try to can apple pie filling. It makes it so easy to make an apple pie or cobbler on the spur of the moment. Just pull the jar out of the pantry and place it in your pie shell and bake. Here's my recipe and how-to for you to do the same.
Apple Pie Filling
Makes 6-7 quart jars
Ingredients: 10 cups water, 4 1/2 cups sugar, 1 cup cornstarch, 3 tbs lemon juice, 1 tsp salt, 3 tsp cinnamon, 1/4 tsp nutmeg, 1/8 tsp ginger & 6-7 quarts peeled, cored & sliced apples. The bottom picture shows the apples I used. From left to right they are Gala, Braeburn & Jonagold, a little different selection this year. I usually use Granny Smith but these were just as yummy.
If you'd like my super easy apple cobbler recipe, leave me a comment and I'll see if I can get it posted. Thanks for checking in on me. And remember an apple a day keeps the doctor away.
Linda
I am lucky enough to have a good source of delicious apples. Every fall I try to can apple pie filling. It makes it so easy to make an apple pie or cobbler on the spur of the moment. Just pull the jar out of the pantry and place it in your pie shell and bake. Here's my recipe and how-to for you to do the same.
Apple Pie Filling
Makes 6-7 quart jars
Ingredients: 10 cups water, 4 1/2 cups sugar, 1 cup cornstarch, 3 tbs lemon juice, 1 tsp salt, 3 tsp cinnamon, 1/4 tsp nutmeg, 1/8 tsp ginger & 6-7 quarts peeled, cored & sliced apples. The bottom picture shows the apples I used. From left to right they are Gala, Braeburn & Jonagold, a little different selection this year. I usually use Granny Smith but these were just as yummy.
Dip the apples in a little lemon juice to keep them from turning brown and set aside.
What else you'll need: 6-7 quart jars with lids and rings, a large stock pot, canning funnel optional (but makes it a lot easier), water bath canner, canning jar tongs.
Blend dry ingredients in a large stock pot. Add water. Bring to a boil over medium heat until thick. Stirring frequently. Add lemon juice. Pack apples in quart jars and pour filling over to fill jar leaving 1/2 inch head space. Place jars in water bath canner. Make sure the water is at a boil already and that it is at least 1 inch over the top of the quart jars. Boil jars for 20 minutes. Remove jars from canner and let cool for 24 hours before moving them to a cool dark storage area. Enjoy!
Linda
Happy Valentine's Day!
February 14th is often a cold bleak day, weather wise, where I live. But yesterday I wanted to show my love to the birds in my yard. I bought a birdhouse that will attract North American Bluebirds. These lovely little creatures would certainly brighten up anyones day.
I have an 8 foot 4X4 post in my garden area that we attatched strings to grow pole beans. Well I am only 5'2" so reaching those beans up high requires a ladder. I moved the eye hooks lower to be more accessable for bean picking. And the frugal person I am, I wanted the upper part of the pole to be put to good use. This made the ideal spot for my new birdhouse.

According to package instructions the bird house should be mounted 5-6 feet from the ground. Not around shrubs or tree line. The opening should face away from prevailing winds. So the birds would be happy facing east. Just clean it out once a year in early spring!
And of course we can't let the birds go hungry, so earlier this winter I hung a bird feeder in the tree. I have a difficult time deciding where to put the bird feeders. I don't like the seed to fall into my flower beds as that tends to grow into unwanted items. So finding a spot the lawn mower can take care of is best. And high enough the dogs won't bother it. This one feeds the little wrens and smaller birds.
I have another that I need to get a shepherds hook for. It will feed the blue jays, cardinals and bigger birds. I don't know alot about bird watching. I just know it makes me happy to watch them and listen to the music they sing! I hope you are having a happy day too! Thanks for checking in on me. Linda
I have an 8 foot 4X4 post in my garden area that we attatched strings to grow pole beans. Well I am only 5'2" so reaching those beans up high requires a ladder. I moved the eye hooks lower to be more accessable for bean picking. And the frugal person I am, I wanted the upper part of the pole to be put to good use. This made the ideal spot for my new birdhouse.
According to package instructions the bird house should be mounted 5-6 feet from the ground. Not around shrubs or tree line. The opening should face away from prevailing winds. So the birds would be happy facing east. Just clean it out once a year in early spring!
And of course we can't let the birds go hungry, so earlier this winter I hung a bird feeder in the tree. I have a difficult time deciding where to put the bird feeders. I don't like the seed to fall into my flower beds as that tends to grow into unwanted items. So finding a spot the lawn mower can take care of is best. And high enough the dogs won't bother it. This one feeds the little wrens and smaller birds.
Wednesday, October 24, 2012
Thought for the Day!
May you find the strength to face tomorrow in the love that surrounds you today!
Tuesday, October 16, 2012
My Tuesday Rant
I love it when a friend tells me they checked on my blog and left a comment. I rush home, log in to see what they said. Then I find nothing there. I know it is not the friends fault. What is it that Google blogger makes it so hard for people to leave comments. It really needs to be changed. I guess my love is more for the things I create than the computer I type it on. HAHA!
I love to hear from you and am sorry this site is not very user friendly at times. Don't give up on me. Continue to leave comments and maybe some day we will figure it all out. Have a great day!
Linda
I love to hear from you and am sorry this site is not very user friendly at times. Don't give up on me. Continue to leave comments and maybe some day we will figure it all out. Have a great day!
Linda
Wednesday, October 10, 2012
Chicken Enchiladas
By special request: Chicken Enchiladas
serves 6-8
2 cans mild enchilada sauce, divided
2 cups chopped, cooked chicken
1/2 cup sour cream
1 dried jalapeno pepper chopped
1/4 tsp salt
2 cups shredded Monterey Jack cheese, divided
10 flour tortillas
Preheat oven to 350 degrees. Pour 1 can of enchilada sauce in a 9X13 baking dish. In a large bowl combine chicken, sour cream, jalapeno and salt. Stir in 1 cup cheese. Spoon about 1/3 cup chicken mixture down center of each tortilla. Roll up tortillas and place, seam side down in prepared baking dish. Pour remaining 1 can enchilada sauce over top, sprinkle with remaining 1 cup cheese. Bake, uncovered for 30 minutes or until cheese is melted. Enjoy!
serves 6-8
2 cans mild enchilada sauce, divided
2 cups chopped, cooked chicken
1/2 cup sour cream
1 dried jalapeno pepper chopped
1/4 tsp salt
2 cups shredded Monterey Jack cheese, divided
10 flour tortillas
Preheat oven to 350 degrees. Pour 1 can of enchilada sauce in a 9X13 baking dish. In a large bowl combine chicken, sour cream, jalapeno and salt. Stir in 1 cup cheese. Spoon about 1/3 cup chicken mixture down center of each tortilla. Roll up tortillas and place, seam side down in prepared baking dish. Pour remaining 1 can enchilada sauce over top, sprinkle with remaining 1 cup cheese. Bake, uncovered for 30 minutes or until cheese is melted. Enjoy!
Tuesday, October 9, 2012
Fancy Braided Scarf
I can't take credit for this cute way to tie a scarf, I found it on Pinterest. So if you have a Pinterest account search for 40 ways to tie a scarf and find more fun ideas. I had several ladies ask me how to do this so here it is. Remember if you want a bigger view of the picture just click on the picture to make it bigger.
You can use a large square scarf or a long rectangular one like mine. Step 1: Put it around your neck with ends even.
Step 2: Start by tying it like you would to tie your shoe. Bring it up to the point where you want the finished scarf to hang. Notice I have the "under" end on my right side.
Step 3: Bring the right over the left.
Step 4: Grab that now left side and draw it up under and over the top.
Step 5: You can pull this as tight or loose as you like.
Repeat Step 3-5 till you get to the end.
Now tie it off. And that's it! Your Fancy Braided Scarf is done.
And see how much patience my furry friends had while I blogged about it. Thanks for checking in on me. Leave me a comment and let me know what you think. Have a great day! Linda
Subscribe to:
Posts (Atom)