Ok, I might be a craftaholic. Or maybe I just have a Pinterest problem. But I feel if you find things on Pinterest why pin them if you're not going to try to make it. So I gave this a shot.
Karen at Somewhat Quirky didn't like her end result but I couldn't wait to make one. This is what you'll need: Paper Mache letter, Alene's Tacky Glue, Aluminum Foil, Mod Podge or a Glue Stick, Gel Stain or Shoe Polish with Applicator Tip.
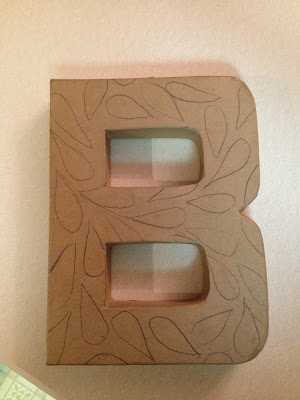
I wanted to have a plan in mind before dripping glue all over the place, so I took a pencil and drew out a design on my initial. (I'm making this B for a shower I'm giving to be part of the decorations and give to the future Mrs. B)
Remember to make your glue design thick. As the glue dries it will shrink. I went back over areas that ended up too thin with an extra bit of glue. Let the glue dry completely.
I chose to use Mod Podge because it is what I had on hand. A craft paint brush, some scissors and maybe some Q-tips will help with the next part. Cut strips of foil slightly wider than the sides of the letter. I then painted the mod podge on the wrong side of the foil strips and apply them to the sides of the letter. Smooth it on and wrap excess onto front and back of letter.
Now lay your letter on a sheet of foil and trace the shape. Cut the foil so it is relatively close to the exact size of your letter. Paint with your adhesive and apply it to the letter. Working quickly, use the Q-tips to gently press the foil around the glue design. Work from the center out to the edge. Foil will tear if stressed too much.
Once you have the front done, use the same method to cover the back. Try not to get glue on the "right" side of the foil as the staining medium may not adhere as well.
This looks pretty good like this but I couldn't resist and wanted to try the shoe
polish with the applicator tip.
I felt the shoe polish didn't come out well and would use gel stain if I do this again. Whatever medium you use, spread it around and take a clean dry cloth to wipe off any excess.
Let this dry completely.
Here are a couple of other blogs to see how they did theirs.
If you give this a try let me know. I'd love to here how yours turned out.
Linda


No comments:
Post a Comment