Friday, July 31, 2015

Bulletin Board Awakening


I have waited 8 years for a kitchen remodel. I think I have a few more years to wait. But in the mean time I just had to do something with this old bulletin board that was hanging over the desk area of the kitchen.

So, the decision. To go with black paint or that new fabulous color I chose for the serving tray a few weeks ago. And you can tell my choice.  Valspar, Sea Seeker from Lowe's. When this kitchen remodel finally comes to be I am lightening everything up not only in the kitchen but in the family room too. But for now let's get back to the bulletin board.


Tape it off. Use a small brush and give it a couple of coats.


It looks awesome.


I originally hung it vertical but decided to go horizontal and cover up the phone wall mount we no longer use. 

If you need a small project to perk up a corner of your home look around and grab some paint. Pretty much everything can be painted. 

Thanks for checking in on me.

Linda

Wednesday, July 29, 2015

Grilled Glazed Salmon

New Recipe Wednesday

I just can't wait. While I finish the month of July recipes up, I want to give you a preview of what's coming for recipes in August!

Salmon! It should be what's for dinner! So good for you!

Wild caught salmon is only available certain times during the year. Typically June, July and August. May also be available in some areas in the winter also. It may cost a little more but it is soooo much better tasting and better for you than farm raised. Farm raised salmon will have antibiotics and PCB's (those are carcinogens, yikes!) 

While it is still hot outside, let's push the cooking onto the patio! Grilled Glazed Salmon.


2 Tbsp Dijon mustard
1/4 cup prepared horseradish
2 Tbsp honey
4 (6 oz) salmon fillets
Olive oil, for rubbing
Salt
Freshly ground black pepper

Preheat your grill.

In a small bowl, mix the mustard, horseradish, and honey. Rub the salmon with oil and season with salt and pepper. Grill the salmon over moderate heat, skin side down, about 3 minutes. Turn and grill 3 more minutes or until done. Turn once again and coat with glaze. Grill another minute.

Serve or you could serve on a kaiser rolls with red lettuce leaves, bacon slices and granny smith apples cut into thin slices. Bacon is typically a bad word in my house but every once in awhile you need to indulge right?

Enjoy!

Linda

Tuesday, July 28, 2015

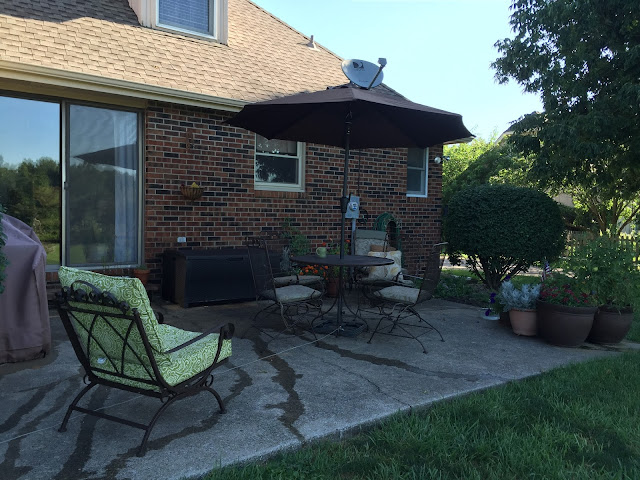
Refreshing the Outdoor Furniture

I am not sure why, but I put this project off too long. The outdoor furniture needed refreshing with a new coat of paint. I bet some of these pieces are 20 years old. Wow, you gotta love iron furniture. This is how I did this.


Pick the most beautiful day of the summer! HA!! I don't know how it happened but there was no wind, full sun in the sky, mid 70's, and super low humidity. Perfect.


This was my paint of choice. I just love it. The furniture was originally green. It had a tiny bit of rust here and there. But not much at all. I took a sponge and with the hose washed down all the pieces. The wire brush made quick work of the bit of rust. Then time to get at it. This handy little handle made it so easy to spray the paint. You can get them in the paint section of the store. So worth it. 


I turned the furniture upside down to spray the bottom first. 2 light coats was all it took. Of course over the next day or so I found a few spots that needed touched up that I had missed. 


It took about 5 hours, all said and done. I couldn't be happier with how they turned out.


It's like have a brand new 8 piece set. 


Thanks for checking in on me.

Linda


Friday, July 24, 2015

Project Potatoes


I have been talking about this project with many of you for it seems like since  last winter. Of course I did not come up with this project on my own. Pinterest, too many projects, too little time. This is the post I got it from. I believe the Seattle Times originally posted this info. We have harvested our first round of potatoes. So get your big girl (or boy) tools out and let’s get started. This project was started on March 14th. Plant as early as March or as late as August 1, with an approximated 3 month till harvest turnaround time.

 Here is what you will need:

Six- 2 inch by 6 inch boards, 8 feet long
One – 2 inch by 2 inch, 12 feet long
2 ½ inch wood screws, glavanized so they won't rust.
Cost? I can't remember exactly what we spent on wood but it was more than I thought it would be. Maybe $30. But if this works I'll be able to use it over and over each year.

Seed  potatoes of your choice. We choose Yukon Gold. Total cost of seed potatoes…99 cents.
Garden soil.


Cut the 2X2 in 33 inch lengths. You should now have 4 – 2X2’s. Next cut your 2X6”s. You need 12 lengths of 21 inches and 12 lengths of 24 inches. 


Now we’re ready to build. Predrill the screw holes in the 2 X 6’s. Attach to the 2 X 2. 


I would have typically done most of this work from here on out but at the time I was dealing with back issues. Just bending to cut the wood was not what my body was wanting to do. So I called hubby in for duty. He’s such a good sport. And afterall he will be eating these delicious gems. 


Now, finish the foundation of the box by adding the other sides. 


I have to tell you I splurged on my soil. I purchased bags of organic potting soil. I wanted something that drained well. And to be honest my garden is full of a lot of clay. This did add some expense to the project but it will be well worth it and I will be able to reuse most of it year to year, adding some of my compost for nutrients. 

Pick your potato box location. Till up the soil a bit. And here is where I added a bit of my potting mix. Now add your seed potatoes.  I cut my potatoes in half and spaced them as so. Cut apart larger seed potatoes, making sure there are at least two eyes in each piece you plant. Give them some water and wait for the magic to happen. 

I love to see the plants peek through the soil.


Once the green plant grew to about 12 inches tall, go ahead and add another round of  boards. This is level 2. And gently put soil to fill. I tried not to break my plants. I was afraid I’d kill them if I did but maybe they would just root and keep growing?  I did not want to chance it. I was determined to see that 100 pounds of potatoes. I'm not sure of when I did this step but I am thinking sometime late April.

Twelve more inches of growth and add another round of boards (level 3) and more soil. It is now May 18th.  

Twelve more inches of growth and add another round of boards (level 4) and more soil. Sometimes life gets crazy. The round of boards are not added yet in this photo because we were on vacation. But it should have been added on  May 25th. It is actually June 1st. That is why the growth is so crazy tall. 


Twelve more inches of growth and add another round of boards (level 5) and more soil. It is now June 1st.  We have had an unreal amount of rain this spring and early summer so I have not had to water at all. I also have an underground spring running  the length of my property where the garden is so….BONUS!! However if your conditions are dry I would recommend watering once a week with well draining soil. 


Twelve more inches of growth and add another round of boards (level 6) and more soil. This is your last set to add. Confession time…again,  life gets in the way. I never did put that top round of boards on. Too late now? I don’t know. Maybe I will get a wild hair and decide to do it this weekend. Or not. ;) 

Okay, the day we have been waiting for!!! We took off that lower board. It is  July 13th. 


Why is it I am always so surprised when things grow? God planned it that way for us right? I dug into the one board we had removed and found potatoes! From small to large. 


It finally comes in handy. My small arms and hands that is. I dug about to the center removing potatoes and dirt as I went. 


I put the dirt back in and screwed the board back in place and decided to go to the opposite side and remove that board to dig to the center. 

We got 10 pounds of potatoes in this first go round! Again, why am I so surprised?  We had potatoes for dinner that night. Yummy!


I hope our luck continues. I’ll continue to update this post as we continue the harvest. So check back in.

Ok, It is now July 22nd. I'm a little worried as I have been reading other blogs about this project not good news. So I headed out to the garden. Took that second board off of both sides and found this.

Ugh! See that tiny thing. Poor baby. It must have been lonely in there all alone. If I had more time I would have taken the 3rd board off but I expect to find even less. Disappointment for sure. But no one can call me a quitter. I am already thinking of how I can improve this. This weekend I want to remove the rest of the boards and see if there are potatoes. If not I plan to find some more seed potatoes. One blog I read said it had to be a certain type of potato but never said what type. Another school of thought is not enough air circulation. Another blogger made his potato tower with wire caging and had success. Some say to add straw in layers with the soil. I will talk to the experts at my local garden center when I buy more seed potatoes. 

Here are a few more thoughts on the subject I found.
Dust the cut pieces with fir dust, which seals the open ends from bacteria.
Fertilize with 10-20-20 fertilizer at planting and a couple of times during the season.
Water so that the plants are kept at an even level of moisture.
Don't plant in the same area in consecutive years or use the same soil to fill your potato box, as potatoes can attract various diseases.
Yukon Golds, and all early varieties set fruit once and do not do well in towers. You only get potatoes in the bottom 6 inches, which is what I got so far. Late season alternatives to yukon gold are Yellow Fin and Binjte.

Check back in. I'm not done yet!!


Linda


Thursday, July 23, 2015

Succulent Update

It was late spring and the rain just kept falling. So I decided to have a succulent planting party since I couldn't get out into the garden.

Check this out to see what we did. I think I mentioned I just couldn't decide what vessel to put my little lovelies in. So you guessed it, I changed my mind and decided to transplant my little garden into a wire basket.

I gently took my babies out of the old vessel.


I had some moss in my stash so I lined my wire basket with it.


Took the original cactus soil from the old vessel and added new. 
Then started to place my plants.


This is my end result. I left room for these little guys to grow.


I decided the best place to grow my succulents was indoors. We have had sooooo much rain and as you know succulents like dry weather. 

Happy growing!

Linda


Wednesday, July 22, 2015

Turkey Burgers

New Recipe Wednesday

It is grill season so get out there. This one is awesome because it is so healthy for you. Turkey Burgers!!! Just leave off the slice of cheese. LOL Serve it with fresh green beans from the garden.

1 lb. ground turkey
1 med red onion, finely chopped
1/2 cup fresh parsley (next time I am going to try oregano)
1 tsp salt
1 tsp pepper
cheese (optional and less fat)

Mix ingredients together and form 4 burger patties. Grill for 7 minutes each side. Don't over cook as nobody likes a dry burger.

We ate these babies so fast I didn't even get a picture. But take a look at this link.

http://userealbutter.com/2008/05/03/turkey-burgers-recipe/

Enjoy!

Linda

Thursday, July 16, 2015

Serving Tray


My sister is coming to visit and when we get together we like to get our "craft on". Yeah, I don't usually use terms like that but yeah! We love to craft. 

Mission: Finish a project in a long weekend. Leave time to shop the West Bottoms, antiques, treasure hunting galore! Take in a Royal's game. Yep, they are my team. Always have been, always will be. Watch some fireworks! And enjoy the rest of the family.

What we did...make your tray and bring it with you. This is how I made mine.

Materials/tools:
I felt my paneling needed a backer so I also used plywood.
Trim if you choose.
Finishing nailer
Construction Adhesive
I used a table saw and miter saw.
Handles of your choice.
Screws for the handles
Paint for the tray.
Paint for the handles.
Drill to predrill handle holes.
Screwdriver

Go to the basement and pull out those scraps! This is my stash.


Decide how big you want your tray. I plan to make a coffee table/ottoman out of pallets and want this tray to sit on it, so I went large. 18X24. I chose some of the tongue in groove paneling I removed from the family room walls a few years back. Cut to size. I also cut a thin piece of plywood the same size.


And here is the paneling I cut to size. I love my big girl tools!


This is how I  decided it should look.


I didn't have any trim I liked to go with this so I made a trip to Lowes. Cut my trim so the corners were mitered. A more professional look I think.


I sanded down the paneling to get the stain off so the paint would adhere better. Believe it or not this was alot darker. (That's why I wanted it off the family room walls)

Time to put it together. I used construction adhesive to bond the plywood to the tongue in groove paneling.


Then I used a finishing nailer with a little more adhesive combo to adhere the trim.


It truly is all about the tools. Makes life so much easier. Now let it sit to dry. I didn't want my thin plywood to warp so I set a cinder block on it. Meanwhile, I hit my local Habitat ReStore to look for handles. I chose the bigger one for my huge tray. After sending a picture to my sister, she wanted the smaller one. These were $1 each. You may find them cheaper or even have some old ones sitting around your house you could use.


I went to my paint stash and brought this up.


Next I soaked the handles in vinegar. Cleaned them up, took a wire brush to the big set as the finish seemed to be peeling, we don't want any of that business. 


I laid the handles bottom side up protecting my table with wax paper. Give them a couple of light coats.


You noticed the shoe box in the background. Grab some toothpicks. Poke them in the shoe box. This holds the handles in place while you paint them so they don't tip over. Give the top side a couple of light coats.


After thinking about what color I wanted my tray to be I decided to splurge and buy a sample of paint. Lowe's has samples of Valspar for $2.98. Pretty good deal. My color is Valspar Sea Seeker. A couple of coats and add the handles.


I felt the color I chose went well with my big ugly chair I made a slip cover for with matching throw pillows.

OKAY!!! Now what my sister Brenda did. (Abbreviated) 

She has a supply of pallets. Her hubby helped her cut some up. Chose a size she liked. Cut 3 pieces of equal length. And cut 2 pieces to sit perpendicular at each end. She used a finishing nailer and tacked them all together. Her paint sample is also Valspar. The color she chose was Heirloom Red. I love it. And she'll have leftover to make a valentine project!


Another aspect she chose to do was to dry brush it. Awesome!!! It looks like she just took it off a barn. A couple of coats of Minwax Polyurethane to protect it. Add the handles and this is what it looks like. I think it is super cute!!!


What fun sister time we have. Love you Brenda!


Related Posts Plugin for WordPress, Blogger...